New Youtube Channel

Now that my home's internet speed is upgraded, I can make more videos!
This is my new channel https://www.youtube.com/channel/UCgW4rIH3Gg6Lc8v4G0QlqgA
Please subscribe!

Friday, July 30, 2010

Fried Milk with Cream Cheese 炸牛奶


Bet you thought they were fries....


I found this fried milk thing while searching for other stuff. I do believe that sometimes we find what we did not intend to search for, and it takes us away from our goal.

There is a Italian version called Crème Fritta, meaning cream fritters, usually a custard, coated in bread crumbs and deep fried. The Chinese version is just a milk pudding coated with a batter. I saw another crème fritta, with cream cheese , but it’s just cream cheese and cream, a bit too heavy think. Why not I combine both recipes??? Fried Milk with Cream Cheese!!!

Fried Milk with Cream Cheese Recipe
500ml full cream milk
250gm cream cheese
100gm sugar
100gm cornstarch

1. Bring cream cheese to room temperature. Beat until it it smooth and free of lumps.
2. Mix cornstarch with 125ml milk, set aside and bring the rest of the milk to a boil with the sugar.
3. Pour some of the boiling milk into cream cheese. Stir. Add milk gradually to the cheese and mix till smooth.
4. Pour cornstarch mixture into(3). Mix.
5. Put milk mixture back into the saucepan/pot, on low heat cook until it thickens. Stir all the time to ensure bottom of pan doesn’t burn.
6. When milk mixture has thickened to a thick paste, pour into a very lightly greased (pour 1 tsp oil onto pan and swipe with a paper kitchen towel all around.) 9X9 square pan. You may use 8X8, just that it’ll be thicker. Both will work well.
7. Leave to cool down. It will harden to be a firm pudding. Chill in fridge until time of use.
*If your milk pudding is not smooth, don’t worry, just whack it with a pot blender.

Frying
~ the Batter (This is enough to fry half the pudding, if you intend to save the other half for tea the next day)

100gm rice flour
25gm all purpose flour
1 tsp baking powder
1/3 tsp salt
1 tsp sugar
185ml water (3/4 cup)

1. Combine everything together to form a batter.
2. Cut milk pudding into strips, or squares, as preferred.
3. Heat few cups of oil and dip each milk pudding into batter and deep fry until golden. Do this one at a time, cos the pudding is quite fragile.
4. Serve hot. You can serve this with a sprinkling of icing sugar or just plain like that.


Verdict: It’s good, that is if you’re a milk lover. Although the cream cheese taste is not that prominent, but it sure lent a creamy end to the fried milk.


Suggestion: I f you want to try this out, maybe try adding in some finely grated parmesan to the milk pudding. It has a stronger cheese taste and smell. I also think that I should put in some salt to the milk.


Take a guess whose hand is that?? Lydia or Lyanne's???

These puffier looking ones were made with a second batch of batter using more baking powder than the 1st. Those fried with 1st batch batter were the first 4 pics. The recipe I gave here is my 2nd batch recipe.


Wednesday, July 28, 2010

Blueberry Flaugnarde


The batter is the same as cherry clafoutis, but when it’s not made with cherries, it goes by the name flaugnarde. Just like Chinese noodles, any noodles made from wheat are called “mein/mian/ 麵” and any noodles made from rice is called “fun/fen /粉”.

Clafouti/ Clafoutis is specific for cherries, so there could not be any plum clafouti or peach clafoutis. I’m sorry if you have one in your blog, but I’m saying it with reference to Wikipedia.

“The clafoutis comes from the Limousin region of France and while black cherries are the traditional there are numerous variations using other fruits including red cherries, plums, prunes, apples, cranberries or blackberries. When other kinds of fruit are used instead of cherries, the dish is called a flaugnarde”


From Wikipedia regarding flaugnarde :
"This is a flan-like baked French dessert with fruit arranged in a buttered dish and covered with a thick flan-like batter. Similar to a Clafoutis which is made with black cherries, a Flaugnarde is made with apples, peaches, pears, plums, prunes or other fruits. Resembling a large pancake the dish dusted with confectioner's sugar and can be served either warm or cold"


So, here I present to you, blueberry flaugnarde, a variation with the same batter recipe, in a small baking dish (1 cup capacity)

65ml whipping cream
35ml fresh milk
½ empty vanilla pod or 2 drops of vanilla extract
1 ½ tbsp sugar
1 egg
3 Tbsp all purpose flour
1 tsp Grand Marnier/ rum (optional), I omitted this this time
Handful of blueberries, about 50gm
Icing sugar for dusting.

1. Preheat oven to 160/180C. (I used only 150C)
2. Bring milk, cream and vanilla to boil on low heat, put in sugar to dissolve. Turn off the heat and let it sit for 5 minutes.
3. Lightly whisk egg and put in flour to mix.
4. Fish out vanilla pod, and pour slowly while slowly whisking into the batter. Add liquer if using. Do not incorporate to much air.
5. Pour batter into a buttered dish, throw in the blueberries (no need to arrange, they'll self arrange) and bake for 25-30 minutes or until golden and set.
6. Dust with icing sugar.


If you'd ask me, with the same batter as the cherry clafoutis, which taste better?
Definately this one, I'd say. And also according to Lydia's nanny. I gave her some of both clafoutis and this flaugnarde.

I never felt blueberries having a very nice flavour and fragrance, just another berry with a nice blue colour. But with this flaugnarde, it totally changed my mind. When I baked this one, I could smell, "Gosh, how come it smells so nice ??". Even after the baking, I kept part of the flaugnarde in the oven, and whenever I walk past that cold oven, I could smell it 3 meters away. That good!!!! 

So, if you let me choose, to make only one with the same batter, I'll definately rather have this than cherry clafoutis. Well, you may ask me, this one tasted batter maybe because you mixed it differently this time??? No it can't be, cos it's the same batter, I split the batter into 2, one pan for clafoutis one pan for the flaugnarde, so there couldn't be any variations on the mixing that made this superior over the clafoutis.


Monday, July 26, 2010

Fragrant Spicy Pork Belly 香辣猪腩


I got this recipe from this site.  I like recipes from Meishi China. It's like a Chinese Tastespotting or Foodgawker. I’ve followed a few with my limited knowledge of the Chinese written language, and so far they haven’t failed me. Maybe sometimes, I need to add a bit more of this, or reduce a bit of that, but overall, I follow 90% of it, and it works.

I don’t want to use pork trotter, so I changed it to pork belly. Made very minor changes but kept the rest as near to the original recipe as possible.

This is my first time using Szechuan Peppercorn. I got mine at a Chinese Medical Hall. 50 sen is a lot, few tablespoons. I wonder when can I use up the 50sen. Maybe forever.
 
The outcome is very nice. Mike ate so much rice with this. My mother in law wants me to make this for next year’s CNY reunion dinner. One miss only.. not spicy enough for me. I’ll add 2 more dried chilies next time.


So here goes my translation and adaptation

Fragrant Spicy Pork Belly Recipe

800gm pork belly with skin, cut into large cubes, about 3cm
1 Tbsp oil

Aromatics
15gm ginger, peeled, sliced
2 shallots, peeled , halved (I added this because I don’t have 15gm of white parts of green onion)
2 sprig green onion, white parts only
3 cloves garlic, skin removed, whole pieces
3 dried chillies, seeds removed, more if you like it extra spicy
1 star anise (2 if it’s small or not very very fragrant)
½ tsp szechuan peppercorn ( original recipe called for 10 pcs only, but I’m lazy to count)

Seasoning (please use a proper measuring spoon, if not the taste will not be accurate)
2 Tbsp Hot Bean Paste (Lee Kum Kee brand)
1 Tbsp cooking wine
1 tsp salt
1 Tbsp light soy sauce
1 tsp dark soy sauce
1 1/2 Tbsp sugar

Few cups of water for braising


1. Bring a pot of water to boil. Put in pork belly cubes and boil until meat turns opaque. Pour meat into a colander and drain the water properly.
2. Heat a wok/claypot. Put in oil, swirl the oil around. Put in the scalded pork pieces, make sure they are spread around in one layer. Do not move them with a spatula for 30 seconds. Then toss and fry the meat until it is slightly browned.
3. Put all the aromatics onto the pork and continues to toss and fry until you can smell the aromatics.
4. Put in all the seasonings except the sugar and continue to fry for one minute. (When you put in the seasonings, do turn the heat to low, when you’re done putting in all the seasonings, return to high heat and cook)
5. Put in few cups of water (let the water cover all the meat) and bring it to a boil. Cover wok/pot with lid. Turn heat to medium and simmer until meat is tender (penetrable with your spatula or a chopstick, always check water level, add more if it dries up.
6. When meat is tender, turn on high heat, put in sugar and let the gravy reduce to preferred consistency.

* Be careful. The gravy can dry up quite fast and burn.

The skin and fatty layers is tender and doesn't taste fatty at all. Very nice.

Saturday, July 24, 2010

Designer Chocolate Baby Grands


These are unfinished cupcakes.

There are 3 parts to it, and I did only 2 and I stopped. I didn’t want to. I was forced to stop, because there’s no space to fill in the final part. This cupcake is supposed to look flat with a shiny lacquer glaze, just like a serene lake. A graceful swan could've swam in it.

The original recipe was really lengthy and I had to read it a few times to get the whole picture because Rose really talks a lot , a bit too much at times, but sometimes it’s really good. Depends on the weather : )

So here, let me simplify it.

Part One
-33gm cocoa powder (I did 30gm)
-59gm boiling water
In your mixing bowl, combine both to a smooth paste and set it aside, let it cool down.

While it’s cooling down, preheat your oven at 175C. I did mine at 170C. Line 14 muffins pans with paper liners.
Prepare dry ingredients,
-37.5gm all purpose flour
-37.5gm cake flour
-1 tsp baking powder
-½ tsp sodium bicarbonate
-150gm sugar together.
-1/8 tsp salt
Mix all together and set aside.

When the cocoa paste has cooled down, put in
-2 large egg yolks
-54gm corn oil
Beat on medium speed for 1 minute. It’ll look like mayonnaise. Well, it is chocolate mayonnaise 

Put in
-½ tsp vanilla extract.
Beat for a few seconds.
Put in half the dry ingredients and beat on low speed until the dry ingredients are moistened. Put in the balance and beat on high speed for 1 minute.

Put in
-2 large egg whites
and whisk on high speed for 2 minutes.
Pour batter into lined muffins pans until 40% full.
Bake in preheated oven for 15-20 minutes, or until skewer comes out clean

Part 2
While cake is baking, prepare the chocolate ganache syrup…. Err… doesn’t look a bit of syrup to me. So thick.
Anyway, here goes.

-85gm milk chocolate (with at least 40% cocoa. For baking, not eating)
-87gm heavy cream (I used whipping cream 36%)
-½ tsp vanilla extract.

Break milk chocolate into small pieces. Put in a microwave safe bowl. Scald cream (cook over medium heat until small bubble appear around the periphery). Pour scalded cream onto chocolate. Leave for 1 minute. Stir until smooth. Put in vanilla and stir.

When cakes are done, remove from oven and immediately poke lots of deep holes(I did 20) in each cake using a skewer. Brush syrup over cake. Let the syrup penetrate the cakes. Brush again after all the syrup has penetrated. (After I brush the cakes with the choc syrup, I always put the cakes back into the warm oven so that the warmth will cause the syrup be more liquidy and penetrate better). Continue to apply until all the syrup is used up. Zap the syrup in the microwave if it gets too cool. The syrup penetrates most readily when it is at 43C, almost hot to the touch.

Allow the syrup to set, for about an hour. (Well, in 38C Malaysia, do you think it’ll set at our room temperature? Fat hopes!!!! )

Well, I stopped here, because my cakes couldn’t take in anymore. They were so full.
There’s supposed to be another Lacquer Glaze that I skipped.

So I just decorated the cupcakes with some silver dragees. That’s it, leave them slightly sticky and serve warm. Utterly delicious!!!

The cakes aren’t supposed to be domed. There’re not many online who have tried making this cake, yet. This book is still quite new. I saw one who successfully made it flat. And I also saw some others complaining about the higher than liner dome. I had the same problem, so I decided, if I want to make it as nice as the picture in the book, I’ll do these next time
1. Reduce the baking temp to 160C or 150C.
2. Bake in 15 cups rather than 14.

Either one…. I’ll see how. I’m determined to finish off the recipe, up to the last step.

The cakes are utterly delicious and they don’t harden in the fridge. I took one cold piece out from the fridge and ate it, still soft and fluffy. Ever seen mayonnaise getting solid in the fridge? Never right? That’s why this cake is soft , even when chilled. It’s made with chocolate mayonnaise. The cake itself is a keeper. I'll be using this cake recipe whenever chocolate cake calls. Nothing better than this : )

I will be doing this again, but not near future. I still have loads of to-do’s on my list.


Rearranged Instructions

Part One
-33gm cocoa powder (I did 30gm)
-59gm boiling water
-37.5gm all purpose flour
-37.5gm cake flour
-1 tsp baking powder
-½ tsp sodium bicarbonate
-150gm sugar together.
-1/8 tsp salt
-2 large egg yolks
-54gm corn oil
-½ tsp vanilla extract.
-2 large egg whites


1. In your mixing bowl, combine cocoa powder and boiling water to a smooth paste and set it aside, let it cool down.
2. Preheat your oven at 175C. I did mine at 170C. Line 14 muffins pans with paper liners.
3. Combine all purpose flour, cake flour, baking powder, sodium bicarb, sugar and salt. Whisk it.
4. When the cocoa paste has cooled down, put in yolks and oil and beat on medium speed for 1 minute.
5. Put in vanilla and beat for a few seconds.
6. Put in half the dry ingredients (3) and beat on low speed until the dry ingredients are moistened. Put in the balance and beat on high speed for 1 minute.
7. Put in egg whites and whisk on high speed for 2 minutes.
8. Pour batter into lined muffins pans until 40% full.
9. Bake in preheated oven for 15-20 minutes, or until skewer comes out clean


Part 2


-85gm milk chocolate (with at least 40% cocoa. For baking, not eating)
-87gm heavy cream (I used whipping cream 36%)
-½ tsp vanilla extract.


Break milk chocolate into small pieces. Put in a microwave safe bowl. Scald cream and pour scalded cream onto chocolate. Leave for 1 minute. Stir until smooth. Put in vanilla and stir.


When cakes are done, remove from oven and immediately poke lots of deep holes in each cake using a skewer. Brush syrup over cake. Let the syrup penetrate the cakes. If syrup get cold, zap in microwave and repeat brushing until all are used up.


Allow the syrup to set, for about an hour before serving.

Thursday, July 22, 2010

Soda Cream Crackers


Sometimes when I buy the 1L pack of whipping cream, I can’t use it up. And sometimes there are recipes that call for just some cream, and it’ll be a waste to buy even a 200ml pack for that. So, whenever I buy that 1L pack, I’ll do a few things with it, and one of it will be cream crackers.

I got this recipe from here but I replaced the milk and butter amount with whipping cream, added some salt and sugar and voila!!! Home made cream crackers. I don’t know why hers are so puffy and mine are just like that… but anyway, the crackers are yummy and crispy.
I halved the recipe

225gm all purpose flour
½ tsp instant yeast (I recommend Saf Yeast for this recipe, cos Saf is sourish, you can read the instruction behind the yeast's pack to add some alkaline to the dough, and this yeast is just perfect here due to the addition of baking soda)
½ tsp sodium bicarbonate
½ tsp salt
1 tsp sugar
130gm whipping cream

1. Mix all the dry ingredients together and make a well in the center. Put in cream and mix. Knead to form a smooth dough.(Kneading is important to form the flake layers but too much will harden the crackers)
2. Leave aside for half an hour (The ori recipe didn’t have this step, I did 30 mins but I reccomend proofing it for an hour or until double for better flake layers)
3. Roll out dough into 2-3mm thickeness.
4. Cut with cookie cutter, (coat with caster sugar) and poke with fork.
5. Bake in preheated oven at 180C or 190C (if your oven has no fan) for 10 minutes.


These crackers get soft easily, so be quick to pack them into air tight containers once they have cooled down. When they have al cooled down, I put all of them in one tray, and bake them again at 150C for another 10 minutes to dry them further. Really crispy this way.

If ever they get lose their crispiness again, zap them in the microwave for a few seconds, leave to cool and you’ll be munching on crispy crispy cream crackers again.

Warning: Be careful with the baking soda amount. I threw my 2nd attempt away because I overdosed on baking soda and my crackers tasted very alkaline (like lye water). I didn't use Saf yeast for both atempts, but I only found out Saf is sourish the hard way when my steamed buns all became sourish. Then I read the yeast's packing and found out, Darn!!! Alkaline should be added when one bakes with Saf yeast. So, if you're not using Saf, please be very careful not to overdose with the baking soda.

Tuesday, July 20, 2010

Cherry Clafoutis


 A not too stale post, did this less than 10 days back. haha.

I’ve never thought of making clafoutis until I saw on Gourmet Baking . Her clafoutis looked so good. So, I googled for more recipe, but still I went back to hers cos it has cream and less flour, something that I prefer. One blogger, Ju just made a cherry clafoutis, posted it yesterday, but she didn't like it, but she used another recipe of which lost to this recipe during decision making time, simply because the recipe she used used only milk and this one uses cream and heck lot of it. Intuition tells me cream taste better than milk, and better not risk wasting those precious cherries. And custards with less flour always taste better than more, I'd rather have softly set custard than hard custard. So, I made the choice to use this recipe, and am glad I did not use JoyofBaking's after reading her post.

Although traditional clafouti/clafoutis will require the cherries to be left unpitted, so that the seeds will release flavor into it, I chose to remove the seeds. I have 2 toddlers, you see and they’ll be definitely eating this. I don’t have a seed pitter (you can easily get this at crockery shops, ask for those things used to remove red date seeds, they are the same as a chery pitter), so I used chopsticks to poke out the seed w/o damaging the whole fruit.


To pit the cherry using a chopstick, first, make a small incision (with a knife) at the bottom of the cherry, directly the other side from the stem. Poke the chop stick in, you’ll feel something hard. Push it firmly but gently, so that you won’t squash the fruit. Then remove the chopstick and push from where the stem was. Finally go back to the bottom of the fruit and push the seed out. Perfect pitted cherries using common household utensil!!!!!

I reduce the recipe to only 1/3 and I could fill up my small heart shaped baking pan (from Daiso)


65gm whipping cream
35gm milk
½ empty vanilla pod (I always keep the scraped pods for times where only a little bit of vanilla is needed), or use 1/8 of a unscraped pod
17gm or 1 ½ Tbsp sugar
1 egg
23gm or 3 Tbsp all purpose flour (sift before measure)
1 tsp Grand Marnier or Kirsch(optional)
A few fresh cherries, pitted or unpitted.
Icing sugar for dusting

1. Preheat oven to 160/180C
2. Heat milk, cream and empty vanilla pod into a small saucepan and bring to boil on the lowest heat. Put in sugar to melt. Set it aside to cool down.
3. Meanwhile, beat the egg in a bowl.
4. Fish out the vanilla pods and pour the cream mixture into the egg. Whisk to combine.
5. Put in flour and whisk to combine.
6. Put in liquer and stir.
7. Pour into a shallow baking dish. (no need to grease, it comes off nicely)
8. Put in pitted cherries and bake for 30 minutes until surface of the clafoutis is golden.
9. Dust with icing sugar.

How does a clafoutis taste like???? Kuih bakar/bengkang, western version with fruits and milk. Haha!!!!
Well, it is similiar, look at the ingredients, what was coconut milk was replaced with milk and cream. What has been pandan was replaced with vanilla, the rest, was pretty much the same, method is also the same. But because this recipe contains less flour, it has the tendency to puff before it even browns. I did this twice and the 2nd time around, I tried not to incorporate too much air in, but it still became a balloon. Nevermind, as long as the taste is good, who cares if its got wrinkly skin.

Actually I quite like it. Will try a blueberry version, but that will not be a clafoutis.

Monday, July 19, 2010

Winners of Ginger Milk Curd Giveaway, announced earlier.

All the entries


The box of fate


The process is fun, they're used to drawing stuff from the box


Now, they've got a name each, who are they?


Galronni,  please email me your mailing address.
Mel, sms me can oredi la.

See, more entries more chances. Galronni had 3 and Mel had 4 entries. Proved my point.


A big thank you for all who tried and submitted their results.
Thanks to all who tried in silence too

Hummingbird Cake


I read about hummingbird cake in the earlier time of blogging. And there was a recipe in joyofbaking that I've bookmarked for so long. Finally I did this (recipe halved), with minor adaptations, especially to the frosting as we prefer it to be pure cream cheese rather than mixed with butter and sugar.

Hummingbird Cake (This amount can serve 10, easily)

55gm pecans (with extra for sprinkling)
210gm a.p.flour (I used cake/superfine)
150gm sugar
½ tsp baking soda
¼ tsp salt
½ tsp cinnamon
2 eggs
90ml corn oil
1 tsp vanilla extract
110gm fresh pineapple, finely chopped
200gm mashed bananas

Topping:
250gm cream cheese
Some chopped toasted pecans
1. Preheat oven to 160/180C. Line the bottom of a 10 inch square pan with non stick baking paper.
2. Place the pecans on a baking sheet and bake in the oven for about 8 minutes or until lightly browned and fragrant. Let cool and then chop finely. Set aside. (I did this step the night before)
3. In a large bowl whisk together the flour, sugar, baking soda, salt, and ground cinnamon. Set aside.
4. In another large bowl, mix together the eggs, oil, vanilla extract, pineapple, mashed bananas, and finely chopped pecans.
5. Add the wet ingredients to the flour mixture and stir until combined. 6. Pour the batter into the prepared pan and bake for about 25 to 30 minutes or until a toothpick inserted in the center of the cake comes out clean.
7. Remove from oven and let cool on a wire rack. After about 10 minutes invert the cakes onto the wire rack, remove the pans and parchment paper, and then cool completely before frosting.
8. To make frosting, just bring cream cheese to room temperature and beat it until smooth.
9. Cut cake into 3, and spread between each layers 1/3 of the cream cheese. Sprinkle chopped pecans on top layer.

Verdict:
Very muffin like. If you are a muffin lover you might love this. Even the method is muffin method, and the cake is way too moist for our liking. It's only after chiling one day in the fridge, uncovered that the cake feels better to eat. If not the cake sticks to the palate, and the tongue and the saliva glands will be so tired trying to clean the palate. But I don't think I'll make this again, sorry no. Or maybe was the problem due to me using cake flour that made it so fine textured and crumbly???
Anyway, it's a big NO.

But my neighbour loved this and wanted to order this from me. Hahaha, different people different tastebuds.
So, I don't know about you, you might like this.


Friday, July 16, 2010

Salmon Congee 三文鱼粥


A recreation of what I’ve tasted at Ryu Men Tei, Subang Jaya.

We always frequent this place when Mike and I still lived in USJ. I think I’ve almost eaten everything on their menu, except for their lobsters and live catches in aquariums. As we only go there for regular dinners, lobsters and those geoducks are a luxury that we never indulged in. Ha, but a good dinner only needs good food, there’s no necessity for luxury stuff. I love everything there.. except for their sushi, which is find to be a bit bland for my taste. Other stuff are pretty nicely seasoned.

Lydia and Lyanne was sick during this weekend (as of this dish, weeks and weeks ago), so, we didn’t go out. What I had in my fridge were salmon, spring onions, filament crab sticks and not much of other stuff. Well, congee was the easiest stuff for Sunday lunch, as I will always cook the rice the night before I sleep and bring it back to a boil in the morning for a smooth smooth congee.

The night before, I boil 5 cups or more water. Wash 1 cup rice and put it in. Bring to a rolling boil and reduce to a simmer for 30 minutes, with lid on. Take a look at the rice, it should look flowered (split). Return the lid and turn off the heat and let it sit overnight. It should look like puffed rice grains the next day. Only use high starch rice to make congee, so that you’ll have nice and smooth results. AAA grade Thai Fragrant rice (jasmine), Japanese short grain rice, or Bario rice will be a good choice.

The next morning,(or you can also do this the night before, just mix both broth and rice together the next day) with another pot, I boil 5 cups or less water or stock or dashi. Put in chicken or whatever meat and let it cook. If it needs to be shredded take it out and let it cool. Then put the cooked rice back in, and bring it back to a boil on high heat for 10 minutes. There you have it, smooth express porridge in the morning. Well of course, you can always use the slow cooker and let it cook overnight the whole thing if you want, but I don’t.


For this time, I used
1 cup Thai fragrant rice (jasmine rice) (Makes about 2.5L porridge)
5 cups or more water
Cook this the night before just before you go to sleep until the rice splits.

5 cups or less water
2 Tbsp mini dried scallops
200gm salmon flesh, or just use one piece of 1 inch thick salmon steak (mine was ¾ of a steak, partially used for Lyanne’s porridge weeks ago)
1 medium carrot
6 pcs filament crab stick
2 sprigs of green onion
Salt to taste (about 1.5 to 2 tsp)

1. Bring water and scallops to a boil and let it simmer for 30 minutes.
2. Either cook the salmon in the microwave, or poach it in another saucepan of water(if you’re scared that it’ll taste fishy) or you can throw it into the pot (that is making scallops broth). Take out the salmon and let it cool down. The fish is cooked when it can be easily flaked.
3. Next, peel and finely dice the carrot, slice the green onions, slice the filament crab sticks finely.
4. By the time you’re done with the cutting and slicing, put the rice back into the scallop broth and bring to a boil on high heat (lid off), don’t’ leave the pot unattended. Stir the rice so that it’ll disintergrate into the broth. Season with salt.
5. Flake the salmon and return it to the pot. Put in finely diced carrots too.
6. When the rice has come to a boil, let it simmer on medium heat for 10 minutes, lid off.
7. Put in the sliced crab sticks, lightly stir and turn off the heat.
8. Put in green onions now or use it as a garnish later.

*The reason why I do this in 2 pots is because reboiling rice can sometimes be a daunting task. It can easily burn or if you stir it while bringing it back to boil, you may scald your wrist or palm because porridge is very very hot, worse than getting scalded by hot water. So bringing the broth to boil, then only you add the rice, reduces the cooking time and less chance of getting scalded.


Mike rarely goes back for seconds when it comes to porridge. He ate 2 big bowls of this. Very very sweet porridge.
He asked me, if this porridge is sold for RM5/bowl, will I make money. I told him Ryu Men Tei sold this for almost RM10  :-)

And I did this again the following week.... this pic below is from the 2nd week , I left some salmon to sprinkle on top for garnish, rather than mixing them all in.

Thursday, July 15, 2010

Ginger Milk Curd Giveaway Submission and Entry Reviews and my experiments too

So, the dateline for submission is here. But, the kind hearted may still submit data of their personal experiments with different brands of milk for the benefit of others.

And now, here are the entries and the summary of their result. As I said, failed or successful is ok, as long as one has tried. I was so happy that this sparked a few of them, the intense curiosity to experiment with more and more brands. That’s the spirit!!!!! Kudos to all of you who tried so hard to find the brand that worked for you.

*************
Sonia
1 entry
Dutch Lady Full Cream Milk - Failed curds

Min
2 entries
Dutch Lady Full Cream Milk- Failed
Dutch Lady Fresh Milk- Successful, softly set

Galronni
3 entries
Marigold Fresh Milk-Succeeded, firm curds
Dumex All in One- Succeeded, soft curds
Marigold HL Milk -Failed

Meldylocks
4 entries
Farmhouse Omega Low Fat Milk – Succeeded, but very softly set
Farmhouse Fresh Milk – Successful with nice curds, extra ginger juice used
Magnolia Low Fat-Hi Cal Fresh Milk – Curds formed, but watery
Anmum Lacta : Curds formed below, but watery top

Annann
1 entry
Dutch Lady Fresh Milk – Successful, soft curds

Cook. Bake.Love
1 entry
Fairprice Full Cream Milk from fresh milk –successful, soft curds

Neyeeloh
1 entry
Dutch Lady UHT fresh milk(full cream) –Sucessful, firm curds

FF
1 entry
Marigold Full Cream Milk (fresh? Reconstituted?)- Failed
The other brands, no pics of curds were shown, therefore, not counted.

Edith
2 entries
Greenfields Choc Fresh Milk – Err… Curds formed, but ultra soft
Emborg Full Cream milk –  Ultra soft curds formed

*************

Please tell me if I left you out or miscounted the entries.
Dateline for discrepancy ammendments : 18/7/10, 12pm+8GMT
Result of giveaway will be announced on 20th July. 2 winners, ok? Promise.

A few myths are dispelled after all these experiments by fellow bloggers,
Powdered milk don’t work –Myth, proved by galronni
Homogenized milk don’t work – Myth, proved by galronni and Meldylocks.

Most of you did not provide information on how the milk was processed, and we are left in lurch whether the milk was homogenized, UHT, pasteurized, emulsified, sterilized, microfiltered…….
People from your country may be able to find the same milk you used, but this information will be useful for others not from your country, so that they know, the success rate of such and such milk, so that they may be able to decide on the type of milk to use in their own country.


Now, I’m suspecting, whether those whose milk formed curds, but was ultra soft or very soft that doesn’t retain its texture after being scooped, will the curds get firmer if more ginger juice was added, cos Meldylocks, showed us that. The brand she used, Farmhouse Fresh Milk was a homogenized milk, and she increased the juice for the 2nd bowl, and indeed it looked so much firmer than her first bowl with less juice. So, maybe for those of you who had super soft curds that doesn’t retain the shape, try increasing the juice, you might get better results.

Such is the power of a cooperative experiment. The amount of information gathered for all.

Sometimes the amount of juice to use is vague. The ginger you have may be juicier than the one I have. The less moisture it has, definitely the more concentrated the juice is. Therefore my 3 tsp of juice may not have the same amount of protease as your 3 tsp of ginger juice. And every knob of ginger is definitely different. So, maybe if it worked for you this time, it may not work the next, but don’t worry, add more until it works : ) As long as you know the brand worked, it’ll work again, but it’s only the difference in the level of firmness.

Sadly, there were no emailed in entries. My silent readers remained as my silent readers. Anyway, not to say my silent readers are not supportive, they still are very supportive of me cos they are reading this now : ) Thanks!

Well, I didn’t sit still and did nothing throughout this period.
How can I not join in the fun and experiment?

*****************************

My experiments, and I hope you do get better results than me if you ever try out these milk.

Dutch Lady

Type of process: Sterilized, No emulsifiers mentioned
Type of milk: Fresh Milk
Protein Content / 100ml: 3.0gm
Fat Content / 100ml: 3.4gm
Coagulation result and texture: Softly set, visible curds, but curds do not stay in shape after scooped


Magnolia

Type of process: Sterilized,Stablized and emulsified
Type of milk: Recombined Full Cream Milk
Protein Content / 100ml: 3.0gm
Fat Content / 100ml: 3.5gm
Coagulation result and texture: Did not set at all.


Marigold HL Milk (the highest protein content milk in the market!!!)


Type of process: Reconstituted, Pasteurized, Homogenized
Type of milk: Low Fat Milk
Protein Content / 100ml: 5.2gm
Fat Content / 100ml: 1.0gm
Coagulation result and texture: Softly set


Goodday Low fat

Type of process: Low fat, pasteurized. homogenized
Type of milk: Low Fat Milk
Protein Content / 100ml: 3.6gm
Fat Content / 100ml: 1.2gm
Coagulation result and texture: Didn’t set at all


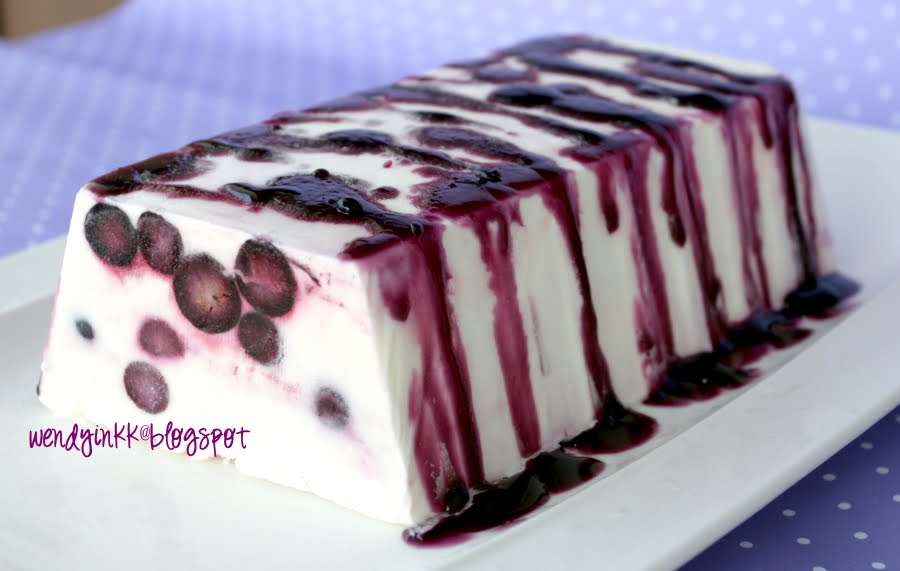
Fresh Goat’s Milk (highest fat content milk I used)
(NBF Ipoh, Tel: +605-5468232, free delivery in Ipoh and Kampar)
First Attempt

2nd Attempt

Type of process: Pasteurized
Type of milk: Fresh Milk
Protein Content / 100ml: 3.7gm
Fat Content / 100ml: 4.5gm
Coagulation result and texture: Firm and smooth

For this one, why I did show two curds? The first one didn't set properly as the top was watery and bottom was firmly curded. So, I suspected, it's the glass. The narrow base didn't cause the ginger juice to incorporate well with the milk when it was poured it, so I did it again with a rice bowl, and hehe, it worked.
So, if yours is watery on top, but curded below, the gushing effect didn't mix things well. And you should know what to do now.


That's all folks for now, I'll add to this post, if ever I do other experiments with other milks.

**************************************

Please put your link here in "comments" if you've tried making Ginger Milk Curd from June 24 to July 15.


The space here, I will update with try-outs that are emailed in.
Hopefully there are entries :)

Entries without either or both
1. picture of milk carton/bottle used
2. picture of failed or successful curds
will be disqualified.

If you used raw milk, which does not come in a bottle or carton, please supply information on where you bought it, so that people who live near you will be able to get their supply too.
Raw milk users who did not include purchase location information will be disqualified :)

Just remember, it doesn't matter if it sets or failed. Just try.

Closing Date: July 15th, 12pm GMT+8.00
Result day : 20th July.

Wednesday, July 14, 2010

Blueberry Ripple Yogurt Ice Cream


You don’t need a ice cream maker for this. Just a hand held mixer or if you don’t own one, just work harder with your whisk.

The original recipe called for Greek yogurt. Yeah, that’s pretty much Greek to me, as that is not available here. So, I substituted it with low fat yogurt and whipping cream to make up for the creaminess that Greek yogurt is supposed to have. And I used gelatin in place of eggs as emulsifiers because I don’t want to cook the yogurt. I’m pretty much scared of breaking up the curds. They don’t stay as creamy yogurt when overheated, you know. I’ve seen somewhere that gelatin can be used to make ice cream to produce that creamy feeling without using eggs.

And with blueberries being super expensive here, I skipped the garnish portion, and used up the berries for the filling, leaving the syrup behind for garnish. I just had to improvise to lower the cost.

Although the yogurt content here seemed low, but no, I let Lydia lick the bowl and she told me it’s yogurt. If kids can tell, I’m sure you can.


(A)
100gm blueberries
2 Tbsp water
1 Tbsp sugar
Cook these in a saucepan over medium low heat until you can see the water turning into a blue colour. Do not stir, only swirl the pan with the handle. Remove from heat. Let it cool.

(B)
1tsp gelatin
2 Tbsp water
Place water in a microwave safe or heatproof bowl. Sprinkle gelatin over water. Let it sit for 5 minutes.
Either microwave on high for 20 seconds or double boil until gelatin melts. Set aside to cool.

(C )
250ml low fat plain yogurt (I used Dutch Lady)
200ml whipping cream
80gm sugar
1/3 tsp gelatin (for use only after ice cream has hardened)

1. Chill mixing bowl in the freezer for 5 minutes.
2. Remove from freezer and pour in cold whipping cream.
3. Beat on low for 1 minute then raise the speed gradually to high and whip until it is almost soft peaks. Put in sugar gradually and whip until soft peaks.
4. With the mixer on, pour in the cooled gelatin mixture (B) and mix until incorporated.
5. With a spatula or spoon, mix in the yogurt. Mix well.
6. Put only the blueberries (A) into the ice cream mixture. Leave the syrup behind and keep it chilled until time of use.
7. Fold the ice cream twice, not too much, you want the ripple effect. Take care not to break the blueberries.
8. Pour ice cream into a 1L capacity loaf tin. (I used a disposable 4cup/1L capacity loaf pan) Freeze until hardened.
9. When it’s almost time to serve, sprinkle 1/3 tsp of gelatin into reserved blueberry syrup and let it sit for 5 minutes. Microwave on high for 20 seconds. Let it cool down.
10. Unmould ice cream onto a chilled serving platter. Drizzle blueberry syrup over ice cream loaf.
11. Slice ice cream to serve. Do not use a scoop.


Taking pictures with ice cream is really tricky. I was a bit slow.. and no, it didn't melt, but it froze the blueberry jelly I drizzled on top.


Printfriendly

Related Posts Plugin for WordPress, Blogger...